Deploying Vesuvian to Production
 Ciprian · · 11 min read
 Deploying Vesuvian
Vesuvian is finally ready to be released out into the wild. It’s by far not complete, and if it were up to me, I’d still need to spend another 6–10 weeks polishing it before it’s really ready to be seen by others, but I absolutely need a gym tracker already and will not settle for anything less.
That’s not to say it’s bad, the exercise library is not massive, but it should satisfy most workouts, and it provides details to a level I haven’t seen in other apps. The AI is getting better and better, the workout builder works, and the metrics tracking is good. Also, the workout session tracker is great, something that I’ve hated in almost every other app.
I still don’t have videos for exercise demonstration, and I keep thinking: would it make people feel better to see an out-of-shape, more technologically than fitness-inclined individual performing exercises with what I hope is great technique? I might be onto something there.
In this blog post I’ll go through the deployment to my Kubernetes cluster - if you have a full-stack app to deploy, this might be useful for you.
1. Environment & Infrastructure
- Confirm cluster namespaces:
saas,ai-production,monitoring,cert-manager - Check Traefik ingress working
- Add Let’s Encrypt DNS-01 ClusterIssuer (Cloudflare)
- Verify A/AAAA records for
api.vesuvian.fit,app.vesuvian.fit,vesuvian.fit - Create K8s Secret with Cloudflare API token
- Test cert-manager challenge completion
I had already created all my namespaces and Traefik was working. I created the API token in Cloudflare and set up the certificate issuer for the new deployment, trying this out given all the challenges I’ve had with Cloudflare, Traefik and Let’s Encrypt in the past.
Although I still had to deal with a couple of snags, I have to say this worked a lot better and I managed to get the certificate issued in a few minutes - and without having to disable Cloudflare proxying like before.
With step one completed, I had a realization that changed everything. Well, two really:
- This was going to take a lot longer than the time I allocated initially.
- It was getting tedious, and I was not making use of all the AI at my disposal.
I’m not trying to fool anyone - that checklist above was also created with AI, so why was I now going to go step by step and bore both you and me with it?

After a couple of rounds of questions (annoyingly many, even though useful) and clarifications with my GitHub Copilot, it diligently started building my configuration while I started building a sandwich - let’s see AI figure out that bread, butter and anchovies are the secret to happiness.

Once Copilot was done generating all the configuration, it was time to start applying it - this is the fun part.
2. Database
- Check Postgres image in
saassupports pgvector - Run one-time Job to
CREATE EXTENSION vector; - Verify connection string and credentials in
.env
pgvector will be used to store the embeddings for exercises, research papers and workouts for the RAG pipeline the AI is using to create programs and answer questions.
Of course the Postgres image in saas didn’t support pgvector, so I had to change it. I also set up some convenience commands to ensure the Vesuvian DB and user exist, and to install the pgvector extension.
Extension and database created, I also created the Vesuvian DB user as a Kubernetes secret which will be used later on. I’m not currently seeding any data since that will be done through the app deployments that are coming next.
3. AI Embeddings Service
- Add
Deployment+Serviceinai-productionnamespace for Qwen3 embeddings - Mount model from
/mnt/models/production/embeddings - Add
NetworkPolicyallowing only API pods - Verify health (
/metricsor/) returns success
For embeddings I’m using the versatile Qwen3 model, in the Qwen/Qwen3-Embedding-8B-GGUF flavor from Hugging Face. It’s got multilingual support, embedding dimensions up to 4096, and Q4 quantization. I already created all the embeddings locally on my GPU - the model in production is only used for creating embedding vectors for queries.
This was quite straightforward since I just reused most of what was configured for the previous inference experiments, this time just using a new deployment. I also set up Prometheus to scrape metrics from the new deployment so I know how things are going.

4. CI/CD
- Add GitHub Actions for backend (build → deploy → migrate → seed → health)
- Add GitHub Actions for frontend (build → deploy → preview)
Now it was time for the deployment pipelines in GitHub Actions. There are several components here - the backend has its own Dockerfile, then I need to figure out how I want to serve the frontend.
I had two options for the frontend: Cloudflare Pages or Netlify. My initial idea was that I liked Netlify for the PR preview function (it creates a separate deployment for every PR so you can preview the changes). However, as attractive as that sounds, for an app that will maybe have 10–20 users and one single developer - not counting my army of AIs - I think the benefits of Cloudflare like CDN, rate limiting, and the fact that I’m already using it to manage DNS make Cloudflare the obvious choice.
It turns out Cloudflare also has the PR preview function. Why would anyone use Netlify anymore?
5. Backend (FastAPI)
- Build container and push to GHCR
-
Deployment+Serviceinsaasnamespace -
Ingresswith TLS via cert-manager - K8s Secret from
.env(kubectl create secret --from-env-file=.env) - Run migrations Job → then seeding Job
- Verify health endpoint and embeddings connectivity
First, I needed to set up the workflow for the backend. Here’s what had to happen before the backend could start:
- Run the seeding function that ensures the exercise library, pre-built workouts and knowledge embeddings are loaded into the DB
- Run Alembic migrations to make sure the database schema is up to date
- Start the backend with Uvicorn
After some research and weighing different options, I decided to keep things as simple as possible while still having enough control - or at least the semblance of it. I created a Docker image that builds a virtual environment based on the Poetry configuration file, then runs the migrations, seeds the database, and finally starts the API service. The seeding scripts are idempotent, meaning they can run any number of times without failing. The migration upgrade only runs when there are changes. I also created a separate Kubernetes job to seed the database if needed.
I already had generated the K8s configuration files with Copilot earlier, just had to fix those up, create the secret from the .env file (I didn’t know I could do that from my local machine with
kubectl -n saas create secret generic api-secrets --from-env-file=.env.k8s --dry-run=client -o yaml | kubectl -n saas apply -f - - that was pretty cool), mess with Postgres and the DB user (I’ve now decided I’ll create a separate database instance for every app; it just feels safer), and finally get the API to run.
Other challenges I had: I forgot to add a /healthz endpoint, so my service would start but K8s couldn’t see that it was healthy; tried setting up the KUBECONFIG secret in GitHub Actions so the GitHub runner could restart the app deployment after building the image; and had a bunch of issues with Poetry versions, the lock file, and installing packages.
At least this time I didn’t have any issues with certificates and networking for a change - I’ve learned my lesson there.
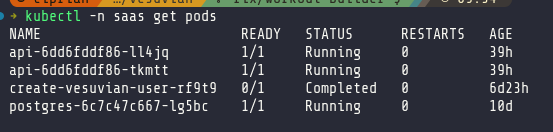
In the end I simplified the configuration: my GitHub Actions workflow now just publishes the Docker image, and I manually restart the service in K8s. Pods are finally running and my backend is accessible.
6. Frontend
- Decide platform (Netlify or Cloudflare)
- Add
VITE_API_BASE_URL=https://api.vesuvian.fit - Build and deploy from GitHub Actions
- Confirm live app on
app.vesuvian.fit - Add redirects or fallback routes as needed
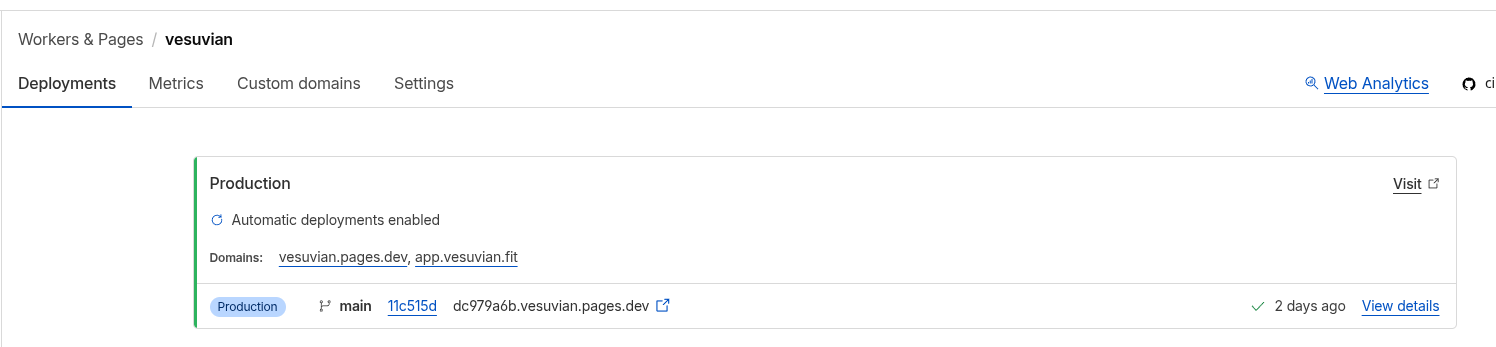
This part was so much easier. Here’s an app idea: Cloudflare Pages, but for backends. And no, ECS, Cloudflare Workers or Vercel functions are not that - I’m talking about deploying a backend system in three clicks and getting the resilience and performance you get from Cloudflare Pages - all with a generous free tier.
Anyway, deploying the frontend was literally just setting up Cloudflare Pages, pointing it to my frontend code, and setting up the environment variables. Because DNS was already managed through Cloudflare, I didn’t even need to touch that.
Not much to say here. Because the frontend is made of compiled static files, it was far easier and worked immediately.
7. Email & Auth
- Add SMTP env vars (Spacemail)
- Test signup + email confirmation
- Verify SPF/DKIM/DMARC DNS
- Validate Google OAuth callback in production
When I initially started building Vesuvian, I was using Supabase, and as soon as I needed anything more than database access and had to use Supabase functions, I decided I hated it. It’s slow and expensive, not to mention the risk that a well-orchestrated attack on your backend can lead to ruin in the form of an invoice for tens of thousands of Supabase function calls.
So I spun up my own auth system. It’s fairly simple, using something like FastAPI Users, and I’ve done it several times in the past. Another reason for doing this was that I kind of hate the local development experience with most tools like Clerk and Supabase. I still have a Docker Compose stack of Supabase that just won’t die.
While I built Vesuvian locally, that was fine, but I really didn’t want to deal with SMTP servers and email verification templates.
After some research, I thought I’d try Zitadel. I liked that it’s both cloud and self-hosted and that I could just run a quick Docker container with the auth system on my local environment. That was one of the worst ways I’ve wasted a couple of hours. Seriously, the UI is ugly, the latest release isn’t fully compatible with their own services, and the setup is just weird. Seriously, if you’re going to go through the effort of using something like Zitadel, just use Keycloak or Ory - those are both incredible products, open source and highly flexible.
Eventually I figured I’d just bite the bullet and use Clerk. No, it doesn’t give me a local auth system, and I do need to set up additional CORS and redirect domains to make sure it works. I’ll also probably need to find a solution if I want to work offline, but I can live with that in exchange for not having to manage authentication myself.
Conclusion
It’s been a while since I set up a complete full-stack deployment of an app. Building with AI agents and tools like Supabase is crazy easy, although with a lot of caveats. Looking at my decision-making for this app, it’s probably all against any kind of LEAN startup principles. Did I validate the idea? No. Did I conduct user interviews? Nope. Did I build a minimal MVP? Yes - for about a minute.
I started from a vibe-coded app with Bolt that didn’t even have a database, then I started from scratch with a proper full-stack approach, abandoned that, and went through several more transformations. I didn’t really need to build my own backend, or host my own embeddings model, or host the app on my Kubernetes cluster.
You know, the tech industry has developed such a fetish for half-assed, incomplete work that we “just ship it!”. We forgot about the craft. We forgot that sometimes you want to build something for yourself, not for others. Do I expect to get rich from Vesuvian? Hell no. But I expect to build an app that I love to build and love to use. And as far as that goes, this made me happy.
Next steps
There are still a couple more things to do:
- create a marketing page
- implement metrics and logs collection
- fully integrated the AI into UI interactions
I’ll do that soon, right now, I need to hit the gym.